Friday, February 24, 2012

Yarn Along Week 7

Photobucket

We're going to finish! We're going to finish! Are you excited!? You should be!

We're not knitting or crocheting today, we're joining pieces. If you don't know how that works, here's some help:

How to join knitting

How to join crochet

It's the same process for both. If you get stuck, just hand sew it with yarn like you'd hand sew with cloth. It's a similar idea.

Anyway. Grab that first big piece we made. The 7 by 5.5 one? Turn it long ways. Now, join one of the 5.5 by 4 inch tall pieces to one part of the top edge, and the other 5.5 by 4 inch tall pieces to the other. MAKE SURE THE BUTTON HOLES FACE INWARD. You're also going to want them on the right side of the doll's body, so keep that in mind.

A diagram, because I know all of that was confusing:

Photobucket

Now. Take both of the 3.5 by 5 inch pieces, and center them on each seam you just made. Sew them in.

Photobucket

You can probably recognize the basic shape that we've got now. We're making a sweater! But you knew that, right? Fold your sweater along the shoulder seams so that the bottom edges touch, right sides together. Start at one sleeve and sew down to the bottom edge (you know, like you were making a shirt), then do the other side. Turn it.

Ta da! Your own doll sweater! Aren't you proud? If you were wondering, and you weren't, all the measurements came from my old 1995 Kirsten sweater. So this pattern will TOTALLY fit a PM doll.

Of course, now that you know what you're doing, you can vary it with stripes, cables, different stitches, pockets, buttons, whatever you can think of. You can even alter my numbers to make it fit better. Or, you can make it really long and make a sweater dress like all the cool kids wear now adays.

Send me the finished project so I can put it in the gallery!

Saturday, February 18, 2012

Price Whine

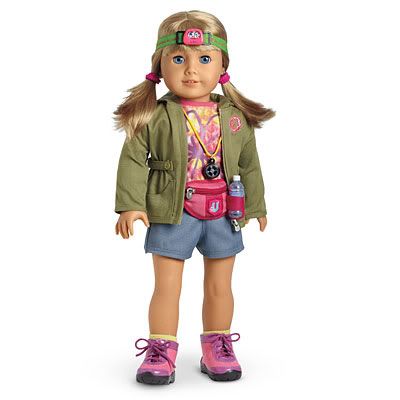
I'm sure everyone else has said this, or at least thought it, but I'll write about it anyway. I was browsing the new release stuff, and while none of it was awful, none of it caught my eye. Well, fine, that means I get to spend less money. Then, this caught my eye:

Photobucket

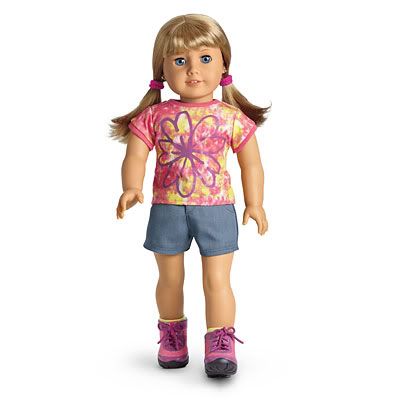
Oh, hey, neat outfit, right? But then I started looking at the pricing.

Photobucket

This alone is $30, and you could make that. Yes you could.

To get the look in the first picture, you've got to spend $68 total. Uh uh. Maybe if it were human clothes, but I'm not spending $70 on doll clothes! Especially since in the accessory pack, you probably only care about the coat. (That water bottle holder is awful. I know no human who would wear that, and I'm sure the water bottle would slide out in real life.)

In conclusion, I hope no one buys this, and AG rethinks their prices.

Friday, February 17, 2012

Yarn Along Week 6

Photobucket

Ah! Last piece! After we get this done, we'll start putting it together. It will look like something and everything!

Today, you're making a flat piece that measures five and a half inches tall by four inches wide.

But.

On the right side of the piece, you need to put button holes. Space them evenly. I'll leave how many up to you. These are dolls, so make them small.

If you're not sure how to do button holes, here's some links:

How to knit button holes

How to crochet button holes

They're really not that hard, you'll do fine.

Oh, button holes ... is this a hint!?

As we go along, tweet or mail me your progress so I can post it. Or, link me to a photo in the comments.

Thursday, February 16, 2012

February Site Of The Month!

This month's site of the month? Give it up for!

Cateskates!

She's getting featured because I really love that she's got hair tutorials on her site. They're very detailed. I never would have thought of it! Hey, Cate, this is for you:

Of course, you should all go check out her blog. There's plenty of pictures and videos to keep you entertained.

(Hey, Lucy, if you'd like to put that award on your blog, go ahead!)

Friday, February 10, 2012

Yarn Along Week 5

Photobucket

All right! Week five! Good on you for hanging in there!

Don't feel behind if you haven't kept up, just keep working! You can do it!

Today's piece is a piece that lays flat and measures three and a half inches tall and five inches wide.

But hey, didn't we make a piece that already looks like that? Hmm. Is that a hint?!

As we go along, tweet or mail me your progress so I can post it. Or, link me to a photo in the comments.

Tuesday, February 7, 2012

Yarn Along Photos

Here's some photos people tweeted out to me of their supplies for the Yarn Along!

Don't forget, you can tweet me pictures too! I'm always @beanstalktweets!

Photobucket

Got this photo from cymbre_z!.

Uploaded from the Photobucket iPhone App

These are from @allicapri

Don't forget to tweet me out pictures of your progress, or post them in the comments!

Friday, February 3, 2012

Yarn Along Week 4

Photobucket

Hey there! Working hard on your ... secret project? I'm still not spilling the beans (lol) as to what we're making. Here's today's project:

You are making one piece that lays flat and measures Five and a half inches tall by four inches wide. 5.5 by 4. Easy! Use the same stitch you've been using and go to town!

As we go along, tweet or mail me your progress so I can post it. Or, link me to a photo in the comments.

Wednesday, February 1, 2012

Buttons!

I wanted to show off my doll button supply:

Photobucket

You probably have figured out that teeny buttons are better for dolls than big buttons. I find that you can get the best selection and value by buying those sacks of buttons at craft stores. I keep mine in little zip lock jewelry bags after I open them.

I've gotten the most mileage out of the blue and brown variety packs. I have no idea why. It seems like one of those two colors always goes with what I'm sewing!

I have totally forgotten what I use the teeny tiny buttons for. I must have gotten them for something, especially those colored ones. Someone told me the white ones are good for replacing the button on Kirsten's blouse from her winter set if anything ever goes awry with that.

I have a soft spot for those dragonfly buttons. They're decorative, obviously, but they added a nice touch for a coat that I made a kid in a sewing swap. I'm pretty sure the square buttons were for a coat too!